Socket Mobile Device Scanner Set-up
Lightning is designed to work with the Socket Mobile scanner line. The following setup guide allows you to put your scanner into Application Mode which is a critical set up step. By putting the scanner into this mode your device will allow the keyboard and scanner to function at the same time.

For maximum use, your scanner must be programmed to operate in Application Mode. This will ensure you can use the scanner and iOS keyboard flawlessly. Before you begin, please ensure that your scanner is NOT connected to your iPad/iPhone/iPod Touch.
Step A

1) Power on the scanner by pressing and holding the small power button on the scanner until the LED turns blue, and it beeps twice.
2) To change the profile to Application Mode please scan the barcode alongside. The scanner will beep 3 times to confirm activation.
The following two steps are typical for any device that you are trying to connect to your iOS device.

Now that your scanner is set, it is time to attach it to your iOS device. The steps below are typical for all iOS devices to be visible by your device. Apple calls this 'Discovery Mode.'
1. Power on the scanner. (small button)
2. Press and hold down the trigger button. (big button)
3. Press and hold down the power button. (small button)
4. After you hear 3 beep chimes, release both buttons.
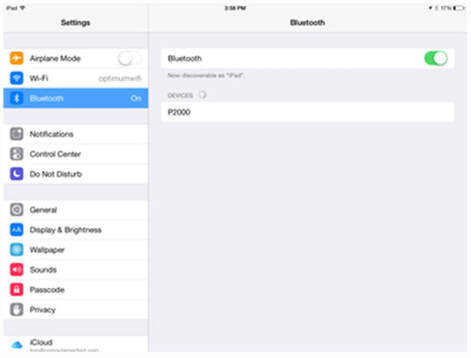
1. On your iOS device, tap the 'Settings' icon to open the Settings App. Tap the 'Bluetooth' menu to open the Bluetooth settings.
2. Turn Bluetooth on. Your iPad will search for available devices to connect with. Once it locates the barcode scanner, will display as "Socket CHS [xxxxxx], tap it to connect. (See image on the left).